一、OPENVPN原理
OpenVPN的技术核心是虚拟网卡,其次是SSL协议实现。
在OpenVPN中,如果用户访问一个远程的虚拟地址,则操作系统会通过路由机制将数据包(TUN模式)或数据帧(TAP模式)发送到虚拟网卡上,服务程序接收该数据并进行相应的处理后,会通过SOCKET从外网上发送出去。这完成了一个单向传输的过程,反之亦然。当远程服务程序通过SOCKET从外网上接收到数据,并进行相应的处理后,又会发送回给虚拟网卡,则该应用软件就可以接收到发回的数据。
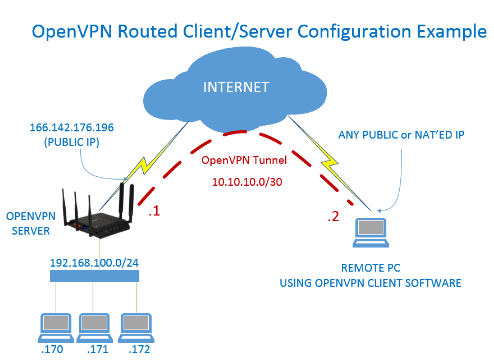
OpenVPN使用OpenSSL库来加密数据与控制信息。这意味着,它能够使用任何OpenSSL支持的算法。它提供了可选的数据包HMAC功能以提高连接的安全性。
OpenVPN提供了多种身份验证方式,用以确认连接双方的身份,包括:
- 预享私钥
预享密钥最为简单,但它只能用于创建点对点的VPN - 第三方证书
基于PKI的第三方证书提供了最完善的功能,但是需要额外维护一个PKI证书系统 - 用户名/密码组合
OpenVPN2.0后引入了用户名/口令组合的身份验证方式,它可以省略客户端证书,但是仍需要一份服务器证书用作加密。
连接后,你仿佛置身于服务端内网,可通过内网互联,解除限制,且公网IP也是服务端IP
二、服务端安装
脚本项目地址:https://github.com/angristan/openvpn-install
一键安装脚本:
curl -O https://raw.githubusercontent.com/angristan/openvpn-install/master/openvpn-install.sh
chmod +x openvpn-install.sh
bash openvpn-install.sh
以下为脚本备份,防删
openvpn-install
根据提示选择。若局域网用了NAT,则需要输入公网IP地址或者主机名。

如果是拨号宽带,公网IP会经常变,建议出口路由器配置动态域名解析(DDNS)
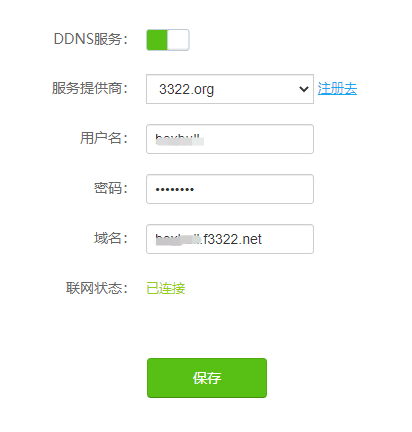
这样,这里填上动态域名就可以了,不惧公网IP变化。
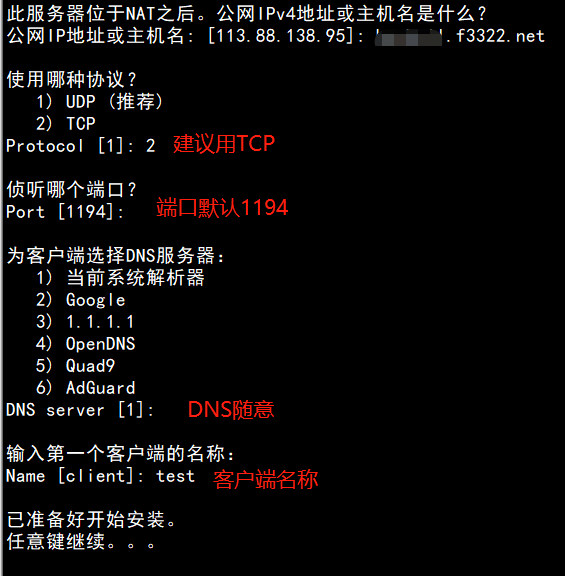
菜单中可选择添加/删除用户,添加的用户可选择加密码或不加密码

配置客户端
默认情况下,客户端的所有流量都会通过 OpenVPN 服务器。我们的需求是仅让请求指定 IP 的流量走 OpenVPN 出口,而其他流量则通过客户端自己的网卡发出。这样可以确保 OpenVPN 流量的精准访问,达到我们的目的,同时不影响客户端本身的网络请求。
# 在生成客户端文件时,默认的配置记录在以下文件中
# 修改这个文件的内容,让每次生成的客户端的配置都按自己的要求来
vim /etc/openvpn/client-template.txt
# 修改这个配置文件,加上以下路由
route-nopull
route 172.31.0.0 255.255.0.0
# 删除默认的这条配置
setenv opt block-outside-dns # Prevent Windows 10 DNS leak
无密码验证的方式只要导入配置文件就可以连接了
有密码验证的方式登录如下:

三、端口映射
需将端口(默认1194)映射到外网,否则客户端无法连接到服务
四、客户端安装
openvpn客户端下载链接:
https://build.openvpn.net/downloads/releases/
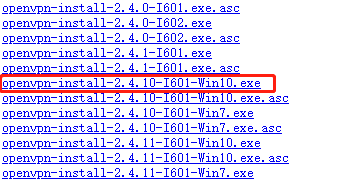
安装后,导入配置文件(上一步中生成的配置文件)
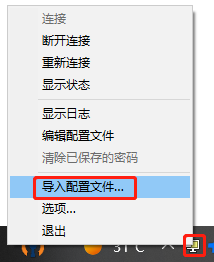
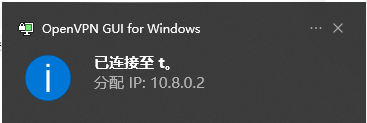
测试IP地址已变成服务器公网IP
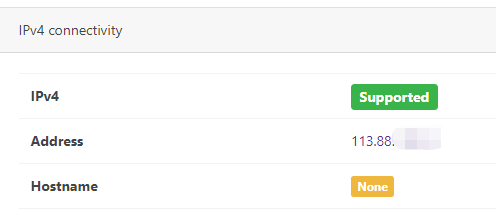
访问内网测试:

linux服务器连接:
nohup /usr/sbin/openvpn --config /etc/openvpn/client/jumpserver.ovpn > /var/log/openvpn.log 2>&1 &【实战】
目标:公司线上业务10.23.0.0/16和10.25.0.0/16,这些机器上有很多内部系统不能对外开放,只能公司内部访问。计划创建一个服务器,安装openVPN服务端+DNS+NG反代,这样客户端连上VPN后,可以通过该服务器跳转到线上真实后端应用服务器。
在该网段中新建一台openvpn服务器,安装openVPN-server服务
放开该云主机的服务端口
在PC下载客户端:https://build.openvpn.net/downloads/releases/OpenVPN-2.6.8-I001-amd64.msi
将服务端生成的配置文件放到PC指定的目录,连接--OK
但是发现一个问题,任何连上OPENVPN的客户端都可以ping通连上线上的所有IP,比如10.23.0.0/16
配置openvpn的iptables规则
-
需在这台OPENVPN服务器上配置iptables
# 启动firewalld服务: sudo yum install iptables-services sudo systemctl enable iptables sudo systemctl start iptables -
禁止OpenVPN服务器上的VPN流量访问10.23.0.0/16和10.25.0.0/16
# 允许OpenVPN流量通过 iptables -A INPUT -p tcp --dport 1194 -j ACCEPT # 拒绝从10.8.0.0/16网段到10.25.0.0/16网段的所有流量。 sudo iptables -A FORWARD -s 10.8.0.0/16 -d 10.25.0.0/16 -j DROP # 允许从10.8.0.0/16网段到10.16.253.210的所有流量。 sudo iptables -A FORWARD -s 10.8.0.0/16 -d 10.16.214.250 -j ACCEPT # 这样,当OpenVPN客户端连接到服务器后,它们将无法访问10.25.0.0/16网段,只能访问10.16.253.210这个地址。 -
保存配置
iptables规则在重启服务器后将被清除。如果希望规则在重启后仍然生效,可以将这些规则添加到iptables持久化配置中,# 这将把当前的iptables规则保存到`/etc/sysconfig/iptables`文件中。 service iptables save -
修改配置
iptables规则按照顺序进行匹配和应用。当有数据包流经防火墙时,防火墙会按照规则列表中的顺序逐个匹配规则,直到找到匹配的规则,然后执行该规则指定的操作。一旦匹配到一条规则并执行了相应的操作,后续的规则将不再被考虑。
可以使用iptables -L FORWARD --line-numbers命令来查看FORWARD链中的规则列表以及它们的顺序。如果需要重新调整规则的顺序,您可以使用iptables命令的--insert选项或--append选项来插入或追加规则。# 删除第二条: iptables -D FORWARD 2 # 插入规则 iptables -I FORWARD 1 -s 10.8.0.0/16 -d 10.16.214.250 -j ACCEPT
配置反向代理服务器
nginx反向代理服务器用宝塔搭建安装。
客户端修改hosts文件
修改客户端本机的hosts文件,将指定系统解析到openvpn服务端,
在域名解析里解析到反向代理的内网IP,默认其他人解析到内网地址了也无法访问,只有连上了vpn才可使用。免去本地修改hosts或者内部DNS的麻烦
修改VPN路由
因为我需要的是想走VPN的IP走VPN,但其他的网络访问都不走VPN。这样就需要自定义路由。主要由route-nopull、vpn_gateway、net_gateway三个参数决定。其中:
-
route-nopull:当客户端加入这个参数后,openvpn 连接后不会添加路由,也就是不会有任何网络请求走 openvpn。
-
vpn_gateway:当客户端加入 route-nopull 后,所有出去的访问都不从 Openvpn 出去,但可通过添加 vpn_gateway 参数使部分IP访问走 Openvpn 出去。
-
net_gateway:这个参数和 vpn_gateway 相反,表示在默认出去的访问全部走 Openvpn 时,强行指定部分IP访问不通过 Openvpn 出去. max-routes 参数表示可以添加路由的条数,默认只允许添加100条路由,如果少于100条路由可不加这个参数。
比较常用做法是在客户端配置文件中加上 route-nopull 再使用 vpn-gateway 逐条添加需要走 Openvpn 的 ip。设置如下:
route-nopull
route 10.16.214.250 255.255.255.255 vpn_gateway
如果想让之后生成的客户端配置都加上这个,需要在该文件添加上述两条:
vim /etc/openvpn/server/client-common.txt设置好后我们进行验证可以发现,tracert -d www.baidu.com 走的出口是本地网卡,而10.16.214.250是走的openvpn的虚拟网卡
怎么查看openvpn的使用记录呢?
留坑
搭建WEB页面供用户访问
openvpn搭建好了,需要将配置文件分发给用户。但是要考虑用户将配置文件私发的问题,且将配置文件私下发给各个对应的用户工作和维护量太大。
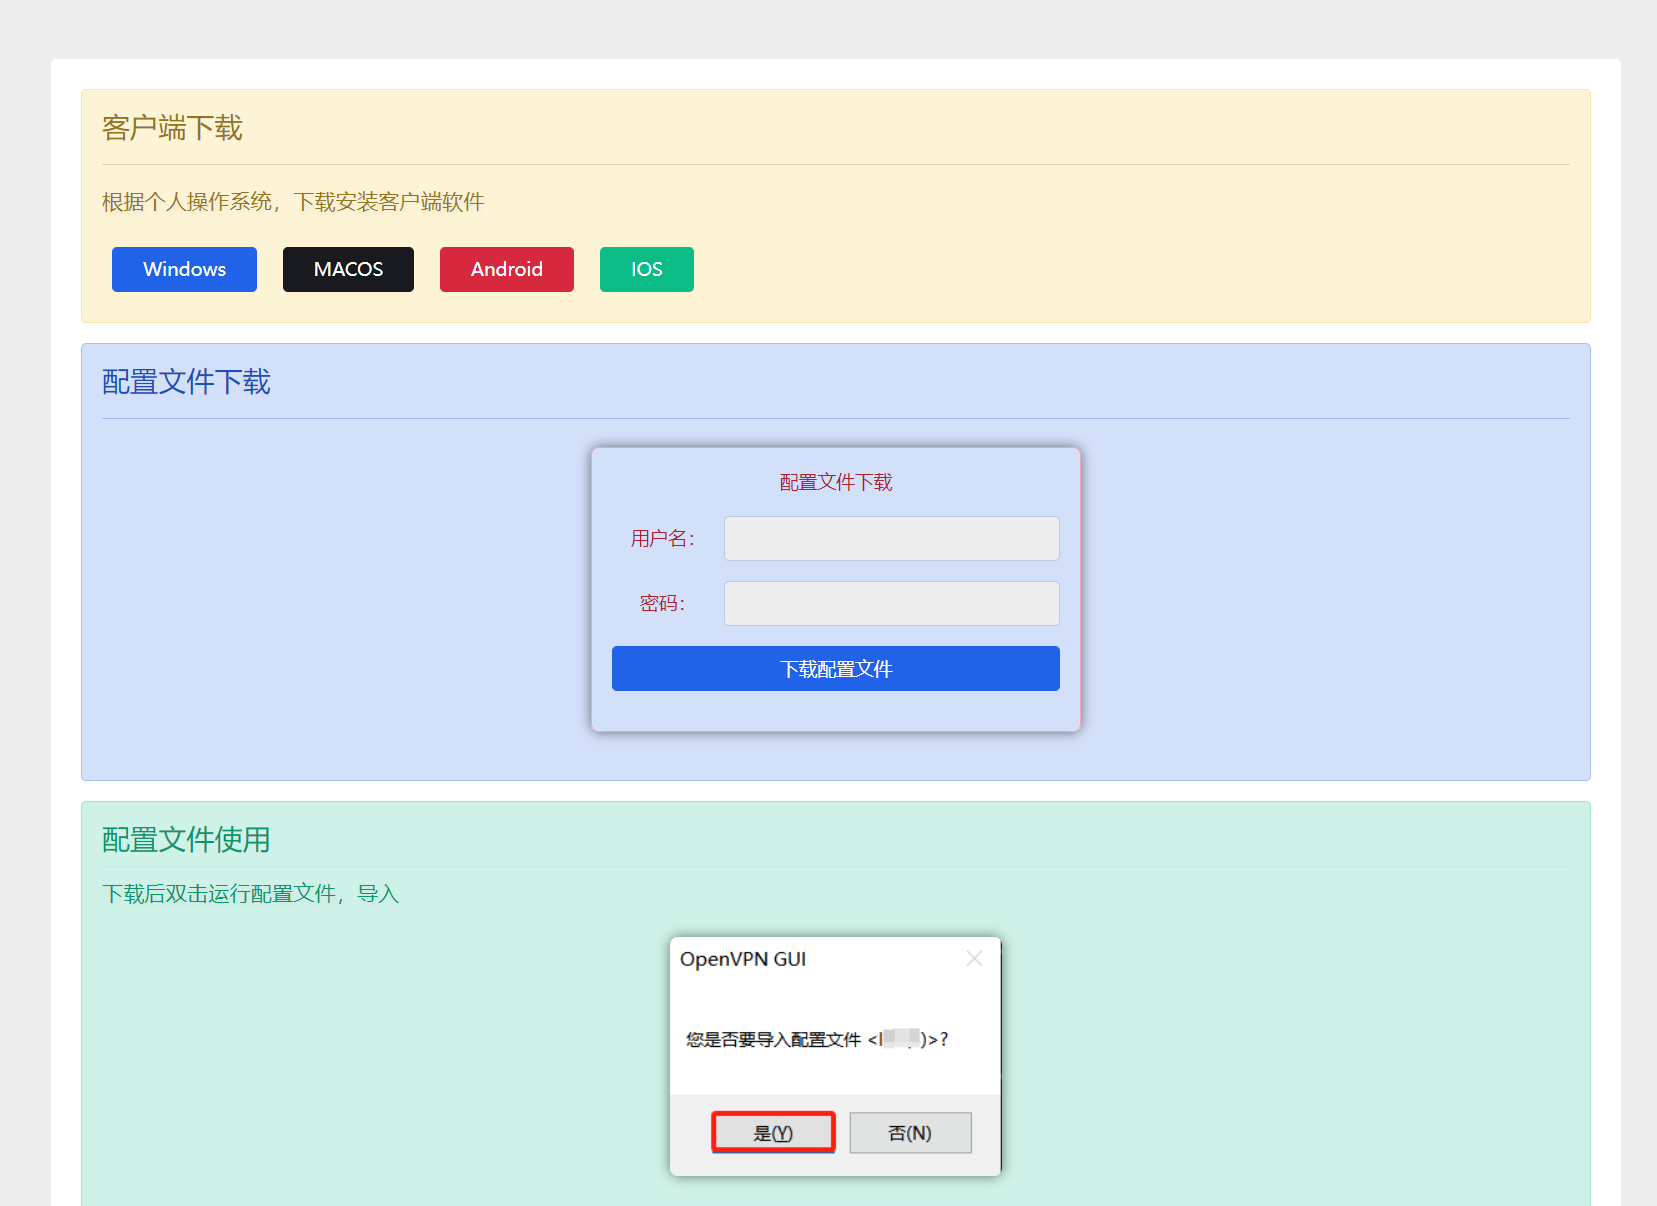
可以搭建一个web页面,供用户自行下载客户端软件和对应配置文件,并在页面附上使用指引。
配置文件需鉴权,只需要私下将页面地址、其用户名、密码发给用户,让其自行下载即可。
页面提供账号密码输入框,当输入正确的账号密码后,将数据库里的配置文件导出给用户下载。
效果如下:
源码如下:(index.html)
<!DOCTYPE html>
<html lang="zh-CN"
data-bs-theme="light">
<head>
<meta http-equiv="Content-Type"
content="text/html; charset=UTF-8">
<meta name="viewport"
content="width=device-width, initial-scale=1">
<title>OPENVPN使用指引</title>
<meta name='robots'
content='max-image-preview:large' />
<style id='md-style-inline-css'>
</style>
<link rel='stylesheet'
id='main-css'
href='main.min.css?ver=7.2'
media='all' />
<script src="jquery.min.js"></script>
<script>
$(document).ready(function() {
$('#passwordForm').submit(function(e) {
e.preventDefault();
var password = $('#password').val();
$.ajax({
type: 'POST',
url: 'check_password.php',
data: { password: password },
success: function(response) {
if (response === 'matched') {
var username = $('#username').val();
window.location.href = 'download.php?username=' + username;
} else {
alert('未匹配');
}
}
});
});
});
</script>
<script type="text/javascript" charset="utf-8">
var input = document.getElementById('myInput');
input.setAttribute('autocomplete', 'off');
</script>
<style type="text/css">
/*文章内图片样式*/
.container img,.container-pw{
border-radius:6px;
margin:1.5em auto;
text-align:center;
/*color:#fea44c!important;*/
background:0 0;
/*text-shadow:0 2px 5px #563719;*/
white-space:nowrap;
border-radius:.43em;
display: block;
text-align: center;
transition: all 0.3s ease;
box-shadow: 0 0 10px rgba(0, 0, 0, 0.5);
}
.container img:active, .container-pw:active{
box-shadow: 0 0 15px rgba(0, 0, 0, 0.7);
}
.container img:hover, .container-pw:hover {
transform: scale(1.02);
}
/*logo尺寸限制*/
.navbar img.logo.regular{
width: 170px;
}
/* 段落字体样式 */
p {
font-size: 17px;
font-weight: 460;
text-shadow: 2px 2px 4px rgb(1 11 111 / 5%);
}
/*标题一*/
.article-content .h1, .article-content h1{
font-size: 30px;
padding: 0 0 0 10px!important;
margin: 40px 0px 24px;
padding-left: 12px;
line-height: 1.2;
border-left: 9px solid #cd311c;
border-bottom: none;
}
/*标题二*/
.article-content .h2, .article-content h2 {
padding: 0 0 0 10px!important;
margin: 40px 0px 24px;
font-size: 28px;
padding-left: 12px;
line-height: 1.2;
border-left: 7px solid rgba(2,3,98,0.9);
border-bottom: none;
}
/*标题三*/
.article-content .h3, .article-content h3{
font-size: 23px;
margin: 40px 0 25px;
line-height: 1.2;
border-left: 5px solid rgba(253,114,31,0.7);
}
/*标题四*/
.article-content h4 {
border-left: 3px solid #bb8e96!important;
padding-left: 10px;
border-width: 5px;
margin: 30px 0 20px;
font-size:21px;
}
</style>
</head>
<body class="logged-in">
<div class="header-gap"></div>
<main>
<div class="container mt-2 mt-sm-4">
<div class="row g-2 g-md-3 g-lg-4">
<div class="content-wrapper col-md-12 col-lg-12">
<div class="card">
<div class="alert alert-warning"
role="alert">
<h4 class="alert-heading">客户端下载</h4>
<hr>
<p>根据个人操作系统,下载安装客户端软件</p>
<a target="_self"
class="btn btn-primary px-4 m-2"
href="#"
role="button"
rel="noreferrer nofollow">Windows</a>
<a target="_self"
class="btn btn-dark px-4 m-2"
href="#"
role="button"
rel="noreferrer nofollow">MACOS</a>
<a target="_self"
class="btn btn-danger px-4 m-2"
href="#"
role="button"
rel="noreferrer nofollow">Android</a>
<a target="_self"
class="btn btn-success px-4 m-2"
href="#"
role="button"
rel="noreferrer nofollow">IOS</a>
</div>
<div class="alert alert-primary"
role="alert">
<h4 class="alert-heading">配置文件下载</h4>
<hr>
<div class="alert alert-danger col-lg-4 container container-pw" role="alert">
<form id="passwordForm"
method="post"
action="">
<!-- 表单 -->
<div class="mb-3 col-lg-12">
配置文件下载
</div>
<div class="mb-3 col-lg-12" style=" display: flex; align-items: center;">
<label for="username" class='col-lg-3'>用户名:</label>
<input type="text" autocomplete="off"
class=" form-control col-lg-9"
id="username"
name="username"
onfocus="this.value=''" autocomplete="off"
required>
</div>
<div class="mb-3 col-lg-12" style=" display: flex; align-items: center;">
<label for="password" class='col-lg-3'>密码:</label>
<input class="form-control col-lg-9"
type="password"
id="password"
name="password"
required>
</div>
<!-- Button -->
<div class="mb-3 col-lg-12">
<button type="submit"
id="click-submit"
class="btn btn-primary mb-12 col-lg-12" style="display:inline-block">下载配置文件</button>
</div>
</form>
</div>
</div>
<div class="ri-accordions-shortcode">
<div class="alert alert-success" role="alert">
<h4 class="alert-heading">配置文件使用</h4>
<hr>
<p>下载后双击运行配置文件,导入</p>
<img fetchpriority="high" decoding="async" width="266" height="191" class="alignnone size-full wp-image-1481" src="img/1.png" alt="">
<p>打开并运行openvpn软件(运行后右下角将显示绿色图标)</p>
<img decoding="async" width="324" height="52" class="alignnone size-full wp-image-1485" src="img/2.png" alt="">
<p>注:配置文件请妥善保管,不要传给他人或上传到公有云</p>
</div>
<
<div class="sidebar-wrapper col-md-12 col-lg-3"
data-sticky>
<div class="sidebar">
</div>
</div>
</div>
</div>
</body>
</html>check_password.php
<?php
$servername = "localhost";
$username = "openvpn";
$password = "xxxx";
$dbname = "openvpn";

// 创建数据库连接
$conn = new mysqli($servername, $username, $password, $dbname);

// 检查连接是否成功
if ($conn->connect_error) {
    die("连接失败: " . $conn->connect_error);
}

// 获取用户输入的密码
$password = $_POST['password'];

// 防止SQL注入攻击
$password = $conn->real_escape_string($password);

// 在数据库中检查密码是否匹配
$sql = "SELECT * FROM openvpn_profile WHERE password = '$password'";
$result = $conn->query($sql);

if ($result->num_rows > 0) {
    echo 'matched';
} else {
    echo 'not_matched';
}

$conn->close();
?>
download.php
<?php
$servername = "localhost";
$username = "openvpn";
$password = "xxxx";
$dbname = "openvpn";

// 创建数据库连接
$conn = new mysqli($servername, $username, $password, $dbname);

// 检查连接是否成功
if ($conn->connect_error) {
    die("连接失败: " . $conn->connect_error);
}

// 获取要下载的用户名
$username = $_GET['username'];

// 防止目录遍历攻击
$username = preg_replace('/[^\w\-\.]/', '', $username);

// 查询数据库获取配置内容
$query = "SELECT config FROM openvpn_profile WHERE username = '$username'";
$result = $conn->query($query);

if ($result->num_rows > 0) {
    $row = $result->fetch_assoc();
    $config = $row['config'];

    // 设置文件下载头信息
    header('Content-Type: application/octet-stream');
    header('Content-Disposition: attachment; filename="' . $username . '.ovpn"');
    header('Content-Length: ' . strlen($config));

    // 输出配置内容给用户
    echo $config;
} else {
    die('文件不存在');
}

$conn->close();
?>
评论(0)